If you have a sliding patio door in your home, you know that the screened portion of the door will become worn and damaged over time. With years of use, metal screens will get dents and creases, fiberglass screens can easily become pulled out of their frame, and cloth screens can be ripped, torn, or moth-eaten. One of the easiest do-it-yourself projects you can tackle at home is to rescreen your sliding door.
Rescreening the door yourself will save time and money, and the end product will result in a major facelift to that area of your home.
Cutlery And More
The first step in rescreening your door is to measure with height and width of the screen frame. Be sure to add a minimum of 2 additional inches to both measurements, to ensure that you have enough material. If you want to err on the side of caution, add 4 to 6 inches to each measurement.
When you go to the hardware store to buy new screen fabric, be sure to take some time to read about the benefits of each type of material. Look for a material that won't be eaten by insects and that contains some type of UV inhibitor to prevent fading and decay. If you live in an area where gnats are a problem, you may also want to choose a very fine mesh to prevent gnats and other small bugs from squeezing through. Keep in mind, however, that the finer meshed screens are also darker, and will let less light shine through.
There are several other items you'll want to pick up while you're at the hardware store. One of these is a product called screen spline. Spline is a thin, spaghetti-like rubber material that is rolled into a groove around a screen door to hold the screen in place. Spline comes in many sizes, so it's advisable to take along a small piece of your existing spline that was holding the old screen in place. You'll also need to purchase a special tool for rolling the spline into the groove, usually called a spline roller. Most large hardware stores will carry such tools, and they make the job much faster and easier. Some spline rollers even feature small hook-shaped knives at the end for cutting off the excess screen fabric, which is a much safer method than using a plain utility blade.
Once you're back at home with all your tools, you'll need to remove the screen door from its rolling track and find a flat place to do the work. A clean garage or porch floor can work quite well. Begin by removing the old spline from all the grooves. Once the spline is removed, the old screen fabric will pull away quite easily. If the channel that holds the spline is dirty, now would be a good time to wipe or vacuum it out.
Now you're ready to install your new screen. Center the new piece of screen fabric over the opening, and begin rolling your spline into the groove, with the screen fabric under it. If possible, having a second person to assist you with this process, by holding the screen square, is very helpful. However, if you do not have someone to help, consider taping the four corners of your screen to the door frame with painters tape. This will help to keep your screen in place as you work your way around the door. Use your spline roller tool to roll the spline into place, making sure it's deeply seated into the channel. Continue this process, working your way around all four sides of the door. When you're done, the screen should be well stretched and taught. The final step is to cut off the excess screen fabric. Perform this step carefully; you don't want to accidentally cut your newly stretched screen.
Unless your door gets a lot of use or you have young children or pets in your home, most homeowners will only need to rescreen their doors once every 5 to 10 years. Once you've completed this project, you'll have the satisfaction of having done the work yourself and knowing that you'll be ready to perform the job again when it's needed next. Now your screen door should look like new again and will be ready for years of additional use in your home.
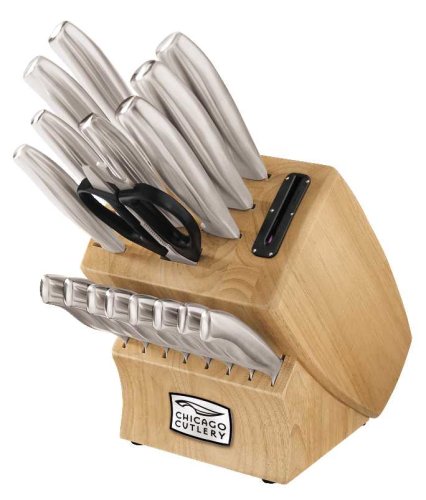
Christmas Sales Chicago Cutlery 18-Piece Insignia Steel Knife Set with Block and In-Block Sharpener 201
Dec 20, 2011 05:26:57
Click for larger image and other views

Christmas Sales Chicago Cutlery 18-Piece Insignia Steel Knife Set with Block and In-Block Sharpener Feature
- Professional high-carbon stainless steel forged blades with stainless steel handles.
- Exclusive Taper Grind edge technology provides optimum sharpness for precise cutting and is easy to re-sharpen
- High-carbon stainless steel creates a stronger, harder blade resisting stains, rust and pitting
- Full metal tang extends from the tip of the blade to the end of the knife forming part of the handle; provides added strength, balance and control
- Forged bolster keeps your fingers from running up on the blade
Christmas Sales Chicago Cutlery 18-Piece Insignia Steel Knife Set with Block and In-Block Sharpener Overview
Chicago cutlery insignia steel 18-piece block set with in block sharpener includes, 1-each 3-inch parer, 3-1/4-inch parer, 6-inch boning, 5-inch utility, shears, 8-inchserrated bread, 7-inch santoku, 8-inch slicer, 8-inchchef, 18-slot block within-block sharpnerSAVE NOW on Christmas Sales Offers below!
Available In Stock. |
| This Christmas Chicago Cutlery 18-Piece Insignia Steel Knife Set with Block and In-Block Sharpener ships for FREE with Super Saver Shipping. |
Price : Click to Check Update Prices Please. |
